How do I create and edit an insertion order?
How do I create and edit an insertion order?
If you have invoice billing set up for your account, you can pay your bills using insertion orders. An insertion order is a contract that sets a monthly limit on your spend.If you have monthly invoice billing set up for your account, you need to have an active insertion order for your ads to be eligible for delivery. An insertion order is a contract that establishes the maximum amount you will spend on your account over a specified period of time. You still control your spend using your campaign budget, and you will only be charged for what you accrue. For example, if you had a month-long insertion order for $5,000 and accrued only $4,500 in charges over the billing period, then we will only deduct $4,500 from your insertion order budget.
Important
The insertion order budget only applies to ad spend, which is an important distinction if your business is in a country/region where online services are taxed. If you have a strict budget limit, you may need to account for taxes in your insertion order budget. To learn more about tax requirements in your business location, see Tax or VAT information.
The insertion order process
You can create the insertion order in Microsoft Advertising or call your Microsoft Advertising account manager to create it for you. (Please note that you must also approve any insertion orders that your account manager creates on your behalf.)
Interested in monthly invoice billing?
You must meet minimum requirements and pass a credit check in order to set up monthly invoice billing. Once you have been approved, you'll see the Insertion Orders page within Billing & Payments. Only Super Admins or Standard Users have permissions to create, edit, approve, and cancel insertion orders. Learn more about user roles.
For more information about monthly invoice billing, see What you need to know about monthly invoice billing.
How do I...
Here's a list of common tasks for managing your insertion orders.

When you create an insertion order, it becomes active on its start date. However, if your Account Manager creates an order on your behalf, you must first approve it so that it's active upon its start date.
-
Select Tools > Billing & Payments > Insertion orders
If you're using the new Microsoft Advertising navigation, from the navigation menu on the left, hover over Billing and select Insertion orders.
- Select Create order > Insertion order to open the order form.
- Select the account.
- Enter the Start date, and the End date, which can be a specific end date, or no end date, and Budget amount, which can be a set amount, or unlimited.
- Optional: Under Backup insertion order, you can avoid a paused account by extending your end date to a maximum of 30 days or setting a backup budget that is less than your original insertion order. If you've enabled the account level backup insertion order, you'll see the default configurations here. To edit, please visit IO grid > Backup insertion order > Edit configurations.
- Optional: Under Purchase order enter a purchase order number that you receive from your company's expense system to help track this insertion order.
- Optional: Under Order name, we recommend that you create a simple, easy to identify order name to help track the insertion order when managing several of them.
- Optional: Under Notes, add any details that might be helpful to you regarding this insertion order.
- If you want to add more insertion orders, select Create another insertion order.
- When you are done, select Submit.
A recurring insertion order is a series of insertion orders that automatically renews according to its set frequency.
-
Select Tools > Billing & Payments > Insertion orders
If you're using the new Microsoft Advertising navigation, from the navigation menu on the left, hover over Billing and select Insertion orders.
- Select Create order > Recurring insertion order to open the order form.
- Under Series name, enter a name that will help identify a grouping of orders. A series name can have a maximum of 60 characters.
-
You'll need to determine whether the series has an end date or if it ends after a number of occurences. Your options are:
- Have an end date for the series, which allows you to add an end date under End date if it's chosen.
- Have no end date, which will allow orders to recur indefinitely until the series is manually cancelled.
- End after a number of occurrences. You can enter a number from 1 to 60.
- Select the account.
- Enter the Start date if you don't want to use the default of today's date.
- Select a Frequency, which defines how an order recurs in the series. You can choose: Monthly, Every 2 months, Quarterly, or Yearly.
- Under End date you can choose from No end date,Set an end date, or End series after a specific date.
- Under Budget, enter an amount. This amount will be used for Series start date.
- Optional: Under Purchase order, enter a purchase order number from your company's expense system to help track this insertion order.
- Optional: Under Order name, we recommend that you create a simple, easy to identify order name to help track the insertion order when managing several of them.
- Optional: Enter Notes that might be helpful to you regarding this insertion order.
- When you are done, select Submit to create a series of orders.
-
Select Tools > Billing & Payments > Insertion orders
If you're using the new Microsoft Advertising navigation, from the navigation menu on the left, hover over Billing and select Insertion orders.
- Find the insertion order with the status Pending your review.
- Next to that insertion order, in the Action column, select approve or decline.
-
Select Tools > Billing & Payments > Insertion orders
If you're using the new Microsoft Advertising navigation, from the navigation menu on the left, hover over Billing and select Insertion orders.
- Select Insertion Orders from the main menu.
- In the Action column, select view.
- On the Insertion order details page, select the print icon
 .
.
Here are a few things to keep in mind when editing an insertion order:
- Once the start date has passed, it can't be changed.
- You can reactivate an expired insertion order by changing its end date to one in the future.
- You can't change the insertion order budget so that it is less than the amount you've already spent.
- You can choose to edit one insertion order within a series. However, if you do so, you'll remove that order from the series, and it will become a standalone insertion order. Any subsequent changes you make to the series won't be applied to the new standalone order.
-
Select Tools > Billing & Payments > Insertion orders
If you're using the new Microsoft Advertising navigation, from the navigation menu on the left, hover over Billing and select Insertion orders.
- Select Insertion Orders from the main menu.
- In the Action column, select edit. If you edit an order that's part of series, you'll be asked whether you want to edit one order in the series or the entire series.
- Make changes to the insertion order (or the series), and select Save.
You'll receive an email to let you know that the changes have been approved or declined.
Reactivating an expired insertion order is as easy as changing its end date to one in the future. When you do, the insertion order will resume and start drawing from its existing budget. So, if you opt to the change the budget, set an amount that's higher than what's been spent so far.
-
Select Tools > Billing & Payments > Insertion orders
If you're using the new Microsoft Advertising navigation, from the navigation menu on the left, hover over Billing and select Insertion orders.
- In the Action column, select edit.
-
Change the End date to a date in the future, and select Save.
You'll receive an email to let you know that the changes have been approved or declined.
If your account manager adds a new insertion order or makes changes to one of your existing insertion orders, you'll need to approve that change. You'll receive an email when there is a change pending your review.
-
Select Tools > Billing & Payments > Insertion orders
If you're using the new Microsoft Advertising navigation, from the navigation menu on the left, hover over Billing and select Insertion orders.
- Find the insertion order that you need to approve. (The status will be Pending your review for a new insertion order or Change pending your review for an existing insertion order that has been modified).
- Next to that insertion order, select approve or decline.
If your account manager adds new insertion orders or makes changes to several existing insertion orders, you'll need to approve those changes. You'll receive an email when there are changes pending your review.
-
Select Tools > Billing & Payments > Insertion orders
If you're using the new Microsoft Advertising navigation, from the navigation menu on the left, hover over Billing and select Insertion orders.
- From the table, select the check boxes next to insertion orders you want to export to approve or decline. (The status will be Pending your review for a new insertion order or Change pending your review for an existing insertion order that has been modified).
- Just above the table, select Bulk actions to open the menu. Then, select Approve or Decline.
You can now pre-approve an insertion order when you're scheduled to take over billing on a linked account.
If your account manager or Microsoft Advertising support creates an account linking request on your behalf, it will include an insertion order that you can pre-approve. The insertion order becomes active on the effective date only if the account link is accepted. A pre-approved insertion order eliminates downtime and ensures that ads continue to serve even as billing responsibility changes hands.
As with any insertion orders created by Microsoft Advertising staff, you'll need to approve it to before it becomes active. You'll receive an email when there is an insertion order pending your review.
-
Select Tools > Billing & Payments > Insertion orders
If you're using the new Microsoft Advertising navigation, from the navigation menu on the left, hover over Billing and select Insertion orders.
- Find the insertion order that you need to approve. (The status will be Pending your review for a new insertion order or Change pending your review for an existing insertion order that has been modified).
- Next to that insertion order, select approve or decline.
At the top of the Insertion Orders grid, you'll find the Filters menu that allows you to filter for insertion orders in up to five of the following 13 dimensions: order name, account name, account number, bill-to customer name, company name, purchase order, notes, start date, end date, budget, balance, currency, and status.
-
Select Tools > Billing & Payments > Insertion orders
If you're using the new Microsoft Advertising navigation, from the navigation menu on the left, hover over Billing and select Insertion orders.
- Select Filters to open the menu, and then select Create filter.
- Select one of the 13 dimensions from the first list. Choose a filter from the second list (contains, does not contain, begins with, end with, equals, and does not equal). Add your filtering criteria in the third box.
- Repeat as desired to add a filter on up to five dimensions.
- If you wish to save your filter, check the box next to Save filter and add a filter name in the adjacent box.
- Select Apply to filter the grid.
-
Select Tools > Billing & Payments > Insertion orders
If you're using the new Microsoft Advertising navigation, from the navigation menu on the left, hover over Billing and select Insertion orders.
- In the Action column, select cancel.
- For a standalone insertion order: Select Cancel Order.
- For a recurring insertion order: You'll be asked whether you want to cancel just one order or the entire series. Choose either Just this order or The entire series.
Bulk tasks via file
Save time with bulk editing. By using the export and import process, you can add, approve, cancel, decline, and edit insertion orders—all at the same time through a single file.
If you have existing insertion orders, you can modify all or selected orders by exporting the data to a file. Each row in the file corresponds to an insertion. Once you finish your edits, you can import the modified file back in to Microsoft Advertising.
-
Select Tools > Billing & Payments > Insertion orders
If you're using the new Microsoft Advertising navigation, from the navigation menu on the left, hover over Billing and select Insertion orders.
-
To export all: Select Export, located just above the insertion orders table.
To export selected insertion orders: Select the check boxes next to insertion orders you want to export to a file, then select Export. - You'll receive exported data in a CSV file, which you can edit.
If you've exported data of existing orders, you'll have a CSV file that contains these headings in the following order: Order ID, Order name, Account ID, Start Date, End Date, Budget, Purchase order, Notes, Status, DealPointID, Record ID, and Order type. Keep in mind that each row of data underneath the heading represents an insertion order.
Six categories are optional (Order name, Purchase Order, Notes, DealPoint ID, Record ID, and Order type). The remaining items are mandatory:
- Order ID is system generated for new orders (so leave that cell blank). For existing orders, the Order ID is returned in the exported file.
- Account ID specifies which account number the insertion order is for.
- Start date is the date when the order becomes active (subject to approval). It must be entered in the MM/DD/YYYY format.
- End date is the date when the order becomes expires. It must be entered in the MM/DD/YYYY format.
- Budget is the amount of the order.
-
Status represents the action that you want to take on the order. Each row can have only one of the following statuses:
- active, which means that you are adding a new order, modifying an existing order, approving an existing order, or approving submitted changes for an existing order as part of the approval process.
- canceled, which means that you are canceling an active order.
- declined, which means that you are declining a new order as part of the approval process.
- changecanceled, which means that you are canceling submitted changes for an existing order as part of the approval process.
- changedeclined, which means that you are declining submitted changes for an existing order as part of the approval process.
Note
If you omit a mandatory item in your file, it will not upload during the import process, and you'll receive an error.
Once you've modified exported order data, you'll be ready to import it back to Microsoft Advertising. You can also follow the instructions below if you prefer to build an import file from scratch.
-
Select Tools > Billing & Payments > Insertion orders
If you're using the new Microsoft Advertising navigation, from the navigation menu on the left, hover over Billing and select Insertion orders.
- Select Import, located just above the insertion orders table.
- You'll see a menu with two choices: Import from file and Import history. Select Import from file.
- Select Choose File if you have an CSV, TSV, or XLSX file to upload, select your file, and then select Continue.
If you prefer to create a file from scratch (rather than using the export function), select Download the import template. You'll receive a CSV file that will allow you to properly format your data for import. - You'll see a high-level preview of the data you're importing. Select Apply changes to start the import.
- Once the import process is complete, you'll see a summary of what was imported and any updates that were skipped.
Note
If you omit a mandatory item in your file, it will not upload during the import process, and you'll receive an error.
You can always review your import history, including import files and error logs, in the Import history page.
-
Select Tools > Billing & Payments > Insertion orders
If you're using the new Microsoft Advertising navigation, from the navigation menu on the left, hover over Billing and select Insertion orders.
- Select Import, located just above the insertion orders table.
- You'll see a menu with two choices: Import from file and Import history. Select Import history.
- To review past imports: Select the file name to see the data within the file.
- To review error logs: If an import failed, you'll see the Download error file link under Error file. Select that link to see the file.
Insertion order status
Insertion order status can help you identify insertion orders that are running smoothly (active) and those that might require your attention (for example, pending your review).
-
Select Tools > Billing & Payments > Insertion orders
If you're using the new Microsoft Advertising navigation, from the navigation menu on the left, hover over Billing and select Insertion orders.
The status column is the second to last column.
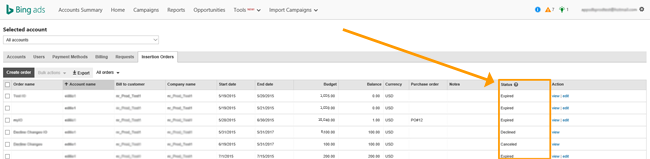
Here's a list of insertion order statuses:
Active: You have an approved insertion order, and your ads are eligible to run.
Canceled: You have canceled an order that you created or that was created by Microsoft Advertising. A canceled order cannot be reactivated.
Change pending your review: You need to approve or decline a change made to an existing order by Microsoft Advertising.
Declined: You have declined an order created by Microsoft Advertising, or the order you created has been declined. Submit a new order, or contact your Microsoft Advertising account manager or contact support.
Exhausted: Your balance has been depleted and the order is no longer active.
Expired: Your order has reached its end date and is no longer valid.
Not started: You have an approved order that has not yet reached its start date.Pending your review: You need to approve or decline an order that Microsoft Advertising created for your account.