How do I edit my downloaded spreadsheet for bulk upload?
How do I edit my downloaded spreadsheet for bulk upload?
Learn how to edit a bulk download spreadsheet to make changes across accounts and campaigns.Note
Not everyone has this feature. See this article for more information.
If you manage multiple Microsoft Advertising accounts you can make updates across any and all of their campaigns at the same time using bulk upload.
The first thing you need to do is download the campaign information you want to see and change. See this article for more information on downloading spreadsheets. Once you have downloaded your spreadsheet, you can edit, add, or remove data, and then upload your changes in bulk.
How to edit spreadsheets

- It's a good idea to save a copy of the original spreadsheet before you make changes. A copy of the original spreadsheet allows you to review your previous settings and revert changes if necessary.
- Do not modify or remove the row that contains the column names.
- Do not modify or remove the Format Version row. The number in the Name column must be 5 or 6.
- The following columns are required for every spreadsheet: Type (for example, Campaign, Ad Group, or Keyword), ID, Parent ID, Account ID, and Name (the value in the Name column refers to the format version).
-
You can remove columns that are not required, but make sure you keep the columns that are necessary to the change you are making. For example, if you want to pause keywords, you must include the Status column. If you want to create a new campaign, you will need to include all campaign columns.
Note: To make sure you don't delete any required columns, you could instead hide the unnecessary columns to make navigating the spreadsheet easier.
- Keep your spreadsheet's rows and columns in the same order as in the original downloaded spreadsheet.
- To delete or empty the existing value of an optional field, enter "delete_value" in the appropriate cell of the spreadsheet.
- You do not need to mark or otherwise call out the rows or columns you have added or edited. When you upload your spreadsheet, Microsoft Advertising will compare it to your current data and find the changes. You will then be able to preview the changes before they are made.
To add an ad, keyword, extension, or any other entity:
- Download an existing campaign that contains the entities you want to add.
- Use these entities' rows as templates for your new entitles, altering information as necessary.
Note
You could instead simply create a new row in your downloaded spreadsheet and fill in all the necessary columns, but starting with an existing campaign's information as a template is advised.
To remove an ad, keyword, extension, or any other entity:
- Find the entity's row in your downloaded spreadsheet.
- Enter Deleted in the Status column.
Important
Deleted entities cannot be restored after you upload the edited spreadsheet.
Understanding your spreadsheet
Each row of your spreadsheet represents a different entity, such as a campaign, ad group, ad, keyword, negative keyword, ad extension, or target. The entities you see in the spreadsheet were determined by the filters and output settings you specified when you set up the query for your bulk download (see Download a spreadsheet for bulk upload for more information).
Exactly which kind of entity a row represents is called out in the first column of the downloaded spreadsheet: the Type column. For detailed explanations of each type and its relevant columns, take a look at this Bing Ads API doc (note: this doc refers to types as "Record types").
Type hierarchy
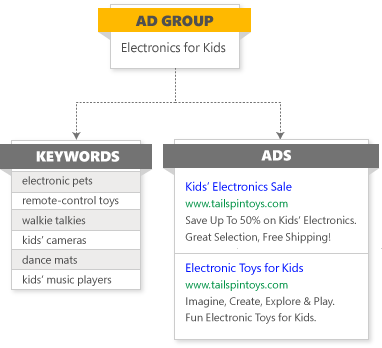
Types have parent-child relationships with one another. For example, in the following diagram, the keywords and ads are children of the parent "Electronics for Kids" ad group. This ad group in turn is the child (or one of several children) of a campaign.
In your downloaded spreadsheet, child types are always listed below their parent types. The relationship is made clear by the entities' ID and Parent ID column values. For linear cases such as Account-Campaign-Ad group, each entity's ID is unique and its Parent ID is the ID of its parent:
| Type | ID | Parent ID |
|---|---|---|
| Account [X] | [Account X's ID number] | [Manager account W's ID number] |
| Campaign [Y] | [Campaign Y's ID number] | [Account X's ID number] |
| Ad Group [Z] | [Ad group Z's ID number] | [Campaign Y's ID number] |
In cases such as ad extensions, entities further down the parent-child chain can have multiple parents. For example, a campaign sitelink extension does not have a unique ID, but instead inherits the ID of the overall sitelink ad extension, and its Parent ID is the campaign's ID. Take a look at the "Adding sitelink extensions through bulk upload" section below for more information.
Note
For a detailed look at type hierarchy—including each type's limits—take a look at this Bing Ads API doc.
Adding a parent and a child at the same time through bulk upload
If you want to add, say, a new campaign and new ad groups all at once through bulk upload, how do you associate the child ad groups to the parent campaign without having an ID for the new campaign? You'd use either a logical reference key or a negative reference key:
Logical reference key:
- For the new parent campaign, enter a unique name in the Campaign column.
- For the new child ad groups, enter the same name in the Campaign column.
Here's what it would look like in your spreadsheet:
| Type | ID | Parent ID | ... | Campaign | Ad Group |
|---|---|---|---|---|---|
| Campaign | ... | Fresh Flowers | |||
| Ad Group | ... | Fresh Flowers | Tulip season | ||
| Ad Group | ... | Fresh Flowers | Lily season |
Negative reference key:
- For the ID of the new parent campaign, enter any negative number.
- For the IDs of the new child ad groups, enter the same negative number.
Here's what this would look like in your spreadsheet:
| Type | ID | Parent ID |
|---|---|---|
| Campaign | [-1] | [existing account ID number] |
| Ad Group | [-1] | |
| Ad Group | [-1] |
Each downloaded spreadsheet comes with columns for all Microsoft Advertising data points. Most columns will be irrelevant—and therefore blank—for any given entity's row. Feel free to delete columns that are blank or unnecessary to your edits, but remember that you must retain the following columns: Type (for example, Campaign, Ad Group, or Keyword), ID, Parent ID, Account ID, and Name.
Notes
- To make sure you don't delete any required columns, you could instead hide the unnecessary columns to make navigating the spreadsheet easier.
- You can't make changes to metrics through bulk upload. For example, you can't raise your CTR just by changing the number in that column!
- For detailed information about which columns are relevant to each entity, take a look at this Bing Ads API doc (note: this doc refers to types as "Record types").
Some specific scenarios
Sitelink extensions are a type of ad extension. In Microsoft Advertising, you create a sitelink extension and associate it to a campaign or an ad group. Microsoft Advertising considers the overall sitelink extension (called here "Sitelink Ad Extension") the parent of either a Campaign Sitelink Ad Extension or an Ad Group Sitelink Ad Extension, depending on whether it's associated with a campaign or an ad group. The Sitelink Ad Extension is considered the child of the account. This relationship looks like this in a downloaded spreadsheet:
| Type | ID | Parent ID |
|---|---|---|
| Campaign [B] | [Campaign B's ID number] | [Account A's ID number] |
| Sitelink Ad Extension [C] | [Sitelink Ad Extension C's ID number] | [Account A's ID number] |
| Campaign Sitelink Ad Extension [D] | [Sitelink Ad Extension C's ID number] | [Campaign B's ID number] |
If you want to create a new sitelink extension through bulk upload, you need to add a row for both a Sitelink Ad Extension and either a Campaign Sitelink Ad Extension or an Ad Group Sitelink Ad Extension. What's more, you need to associate the child to the parent Sitelink Ad Extension even though the Sitelink Ad Extension does not yet have an ID. To do this, you'd use a negative reference key:
- For the ID of the new parent Sitelink Ad Extension, enter any negative number.
- For the ID of the new child Campaign Sitelink Ad Extension or Ad Group Sitelink Ad Extension, enter the same negative number.
For example, here's what it would look like to add two new Sitelink Ad Extensions —one associated to an existing campaign, and one to an existing ad group:
| Type | ID | Parent ID |
|---|---|---|
| Sitelink Ad Extension | [-123] | [Existing account ID number] |
| Sitelink Ad Extension | [-456] | [Existing account ID number] |
| Campaign Sitelink Ad Extension | [-123] | [Existing campaign ID number] |
| Ad Group Sitelink Ad Extension | [-456] | [Existing ad group ID number] |
Call extensions are a type of ad extension. In Microsoft Advertising, you create a call extension and associate it to a campaign or an ad group.
- In your downloaded spreadsheet, find the row for the call extension.
- In the Phone number column, enter the phone number for your location (the maximum number of characters is 35).
Location extensions are a type of ad extension. In Microsoft Advertising, you create a location extension and associate it to a campaign or an ad group.
- In your downloaded spreadsheet, find the row for the location extension.
- In the Business name column, enter the phone number for your location (the maximum number of characters is 80).
- In the Phone number column, enter the phone number for your location (the maximum number of characters is 35).
Image extensions are a type of ad extension. In Microsoft Advertising, you update an already created image extension and associate it to a campaign or an ad group.
- In your downloaded spreadsheet, find the row for the image extension.
- In the Alternative text column, enter the Display text for the image extension (the maximum number of characters is 35).
- In the Description column, enter the Description for the image extension (the maximum number of characters is 100).
- In the Final URL column, enter the Final URL for the image extension (the maximum number of characters is 2,048).
Callout extensions are a type of ad extension. In Microsoft Advertising, you create a callout extension and associate it to a campaign or an ad group.
- In your downloaded spreadsheet, find the row for the callout extension.
- In the Callout text column, enter the extra piece of text that highlights your website's products or offers (the maximum number of characters is 25).
Review extensions are a type of ad extension. In Microsoft Advertising, you create a review extension and associate it to a campaign or an ad group.
- In your downloaded spreadsheet, find the row for the review extension.
- In the Text column, enter the text that appears below your ad that is either paraphrased or an exact quote from a reputable third-party source (the combined character limit for both the text and source is 67 characters).
- In the Source column, enter the name of the third-party source from where your review is from (the combined character limit for both the text and source is 67 characters).
- In the URL column, enter the landing page of the third-party source where the review is from (the maximum number of characters is 255). The URL must start with "http://" or "https://" and the source and URL must refer to the same third-party.
Structured snippet extensions are a type of ad extension. In Microsoft Advertising, you create a structured snippet extension and associate it to a campaign or an ad group.
- In your downloaded spreadsheet, find the row for the structured snippet extension.
- In the Structured Snippet Header column, enter one of the available headers.
- In the Structured Snippet Values column, enter 3 to 10 items, separated by semicolons, to appear after the header.
Targeting is showing ads only to specific groups of Microsoft Advertising customers by adjusting bids for these groups. Here is how you add targeting through bulk upload:
- Create a new row in your spreadsheet below the row for the campaign you are working with.
- In the Type column, enter the appropriate type (see the table below).
- In the ID column, enter the ID of any existing targeting set up for this campaign (all of a campaign's targets share the same ID). Note: If you leave this blank, you will wipe out any existing targeting.
- In the Parent ID column, enter the campaign's ID (targets are children of their campaign).
- In the Target column, enter the appropriate target for this target type (see the table below). Note: The Target column is several dozen columns to the right of the Parent ID column.
- In the Bid Adjustment column, enter the percentage value (positive or negative) you want to adjust the bid for this target. See the table below for the possible range of bid adjustments for each target type. Note: The Bid Adjustment column is several dozen columns to the right of the Parent ID column.
- If necessary, enter further information in other targeting columns relevant to this target type (see the table below).
| Type | Targeting method | What goes in the Target column | Bid adj. range | Other relevant columns |
|---|---|---|---|---|
| Campaign Location Criterion | Area targeting | Postal code or name of city, DMA, state, or country/region | -90 to +900 | Sub Type : City, Metro Area, Country, State, or Postal Code |
| Campaign Radius Criterion | Radius targeting | Leave Target blank for radius targeting | -90 to +900 |
Name
: The postal code, city, etc. you are pinpointing Radius: The number of units around the point to include Unit: Miles or Kilometers |
| Campaign Location Intent Criterion | Physical location targeting | PeopleInOrSearchingForOrViewingPages, PeopleSearchingForOrViewingPages, or PeopleIn | Not applicable | None |
| Campaign Age Criterion | Age targeting | EighteenToTwentyFour, TwentyFiveToThirtyFour, ThirtyFiveToFortyNine, FiftyToSixtyFour, or SixtyFiveAndAbove | -90 to +900 | None |
| Campaign DayTime Criterion | Ad scheduling | Monday, Tuesday, Wednesday, Thursday, Friday, Saturday, or Sunday | -90 to +900 |
From Hour
: The hour of the day (in 24-hour time) for the start time From Minute: The minute of the From Hour for the start time To Hour: The hour of the day (in 24-hour time) for the end time To Minute: The minute of the To Hour for the end time |
| Campaign Gender Criterion | Gender targeting | Male or Female | -90 to +900 | None |
| Campaign DeviceOS Criterion | Device targeting | Computers, Smartphones, or Tablets | -100 to +900 | None |
Important
Leaving a new target's ID column blank (or entering a unique number) will overwrite any existing targeting you have set up for this campaign. To avoid this, use the same ID number as your existing targets.
Audience targeting allows you show ads only to relevant users. Here is how you can add audience associations through bulk upload:
- Create a new row in your spreadsheet below the row for the ad group or campaign you are working with.
- In the Type column, enter the appropriate type (see the table below).
- In the Parent ID column, enter the ad group or campaign's ID (targets are children of their ad groups or campaigns).
- In the Audience ID column, enter the appropriate audience ID for this audience type (see the table below). Note: The Audience ID column is several dozen columns to the right of the Parent ID column.
- In the Bid Adjustment column, enter the percentage value (positive or negative) you want to adjust the bid for this target. See the table below for the possible range of bid adjustments for each target type. Note: The Bid Adjustment column is several dozen columns to the right of the Parent ID column.
- If you want to set the targeting setting, you need to go back to the ad group row and locate the Target Setting column. Leave the cell empty if you want to set it as Bid only or enter "Audience" if you want to set it as Target and bid.
- If necessary, enter further information in other targeting columns relevant to this target type (see the table below).
Important
Not everyone has the ability to associate audiences at the campaign level yet.
| Association type | Audience category | What goes in the Audience ID column | Bid adjustment range | Other relevant columns |
|---|---|---|---|---|
| Ad Group/Campaign Remarketing List Association | Remarketing list | ID of the remarketing list | -90 to +900 | Audience : name of the remarketing list |
| Ad Group/Campaign Custom Audience Association | Custom audience | ID of the custom audience | -90 to +900 | Audience : name of the custom audience |
| Ad Group/Campaign Dynamic Remarketing List Association | Dynamic remarketing list | ID of the dynamic remarketing list | -90 to +900 | Audience : name of the dynamic remarketing list |
| Ad Group/Campaign In Market Audience Association | In-market audience | ID of the in-market audience | -90 to +900 | Audience : name of the in-market audience |
| Ad Group/Campaign Similar Remarketing List Association | Similar to remarketing list | ID of the similar to remarketing list | -90 to +900 | Audience : name of the similar to remarketing list |
| Ad Group/Campaign Negative Remarketing List Association | Remarketing list | ID of the remarketing list | Not applicable (this an exclusion) | Audience : name of the remarketing list |
| Ad Group/Campaign Negative Custom Audience Association | Custom audience | ID of the custom audience | Not applicable (this an exclusion) | Audience : name of the custom audience |
| Ad Group/Campaign Negative Dynamic Remarketing List Association | Dynamic remarketing list | ID of the dynamic remarketing list | Not applicable (this an exclusion) | Audience : name of the dynamic remarketing list |
| Ad Group/Campaign Negative In Market Audience Association | In-market audience | ID of the in-market audience | Not applicable (this an exclusion) | Audience : name of the in-market audience |
| Ad Group/Campaign Negative Similar Remarketing List Association | Similar to remarketing list | ID of the similar to remarketing list | Not applicable (this an exclusion) | Audience : name of the similar to remarketing list |
Participation level in Microsoft Audience Ads is set by a bid adjustment at the campaign or ad group level. To adjust your audience ad bid through bulk upload:
- In your downloaded spreadsheet, find the row for the correct campaign or ad group.
- In the Bid Adjustment column, enter an adjustment for your audience ad bid (the possible range is a percentage between -100 to +900).
Microsoft shopping campaigns make it easier for you to advertise your products from your Microsoft Merchant Center store online.
Important
- If you don't have one yet, you'll need to create a Microsoft Merchant Center store before creating a Microsoft shopping campaign.
- Your shopping campaign won't work until you create a catalog feed file and submit it.
To create a Microsoft shopping campaign through bulk upload, you'll need to add a row for:
- A new campaign, making sure to:
- In the Type column, enter Campaign.
- In the Parent ID column, enter the ID of this campaign's account.
- In the Campaign column, enter a unique name for this shopping campaign.
- In the Time Zone column, enter the time zone of your business or campaign target. See this Bing Ads API doc for a list of possible time zone values.
- In the Budget column, enter the amount you want to spend per day on this campaign.
- In the Budget Type column, enter DailyBudget.
- In the Campaign Type column, enter Shopping.
- In the Priority column, enter 0, 1, or 2. This setting helps determine which Microsoft shopping campaign serves ads in the event that two or more campaigns use the catalog feed from the same Microsoft Merchant Center store. The higher numbers are given higher priority.
- In the COUNTRY_CODE column, enter the country code that corresponds to the country/region you selected when setting up your Microsoft Merchant Center store. The following country codes are currently supported: AU (Australia), GB (United Kingdom), DE (Germany), FR (France), and US (United States).
- In the Store ID column, enter your Microsoft Merchant Center store's ID.
- A new ad group, making sure to:
- In the Type column, enter Ad Group.
- In the Parent ID column, enter the ID of this ad group's campaign.
- In the Campaign column, enter the name of your shopping campaign.
- In the Ad Group column, enter a unique name for this ad group.
- In the Pricing Model column, enter either CPC (cost per click) or CPM (cost per thousand impressions).
- In the Search Network column, enter On.
- In the Content Network column, enter Off.
- In the Language column, enter a language code that corresponds to the country/region of your Microsoft Merchant Center store and your campaign's COUNTRY_CODE setting. See this Bing Ads API doc for a list of possible language codes.
- One or more Ad Group Product Partitions.
Note
An Ad Group Product Partition is part of what is referred to elsewhere in Microsoft Advertising as a "product group." There is a one-to-one relationship between ad groups and product groups. If you were creating a product group in Microsoft Advertising, you would divide it into different levels based on attributes (see Understand and use product groups for more information). These divisions are referred to as Ad Group Product Partitions in bulk upload.
- In the Type column, enter Ad Group Product Partition.
- For the root Ad Group Product Partition of your product partition group tree structure:
- In the ID column, enter a unique negative number (this is a negative reference key, as discussed above).
- Assuming you are creating sub-partitions for this Ad Group Product Partition, in the Sub Type column, enter Subdivision (if you are not subdividing this Ad Group Product Partition, enter Unit). Note: A Subdivision must contain at least two Units.
- In the Ad Group column, enter the name of your ad group.
- For a Subdivision:
- In the Product Condition 1 column, enter All.
- Make sure the Product Value 1 column is blank.
- Make sure the Parent Criterion ID column is blank.
- For a Unit:
- Use the product condition and product value columns to identify how to branch your shopping campaign. These columns refer to the optional fields you set up in your catalog feed file, such as brand, condition, product category, product type, and custom label. See the "Product Categories" list in this Bing Ads API doc for more information. Note: Always start with Product Condition 1 and Product Value 1 and go deeper (to 2, 3, 4, etc.) as necessary.
- In the Parent Criterion ID column, enter the same negative number as the Subdivision of this Unit.
- You can subdivide an Ad Group Product Partition up to seven levels deep.
- For each sub-partition row, enter the root partition's ID number in the Parent Criterion ID column.
- Each branch of the structure must end with an Ad Group Product Partition with "Unit" in the Sub Type column
- Every "Unit" Ad Group Product Partition must have a bid (a value in the Bid column), unless it has "TRUE" in its Is Excluded column.
- For more technical information on setting up Ad Group Product Partitions (and Microsoft shopping campaigns"> in general), see this Bing Ads API doc.
Important
You can't add product ads themselves using bulk upload. After you upload your new Microsoft shopping campaign, you will need to edit it in Microsoft Advertising to add product ads.
You can get more accurate conversion tracking data by adding the Microsoft Click ID (MSCLKID) to your URLs. To enable auto-tagging of Microsoft Click ID through bulk upload:
- In your downloaded spreadsheet, find the MSCLKID Auto Tagging Enabled column and enter "TRUE" in the cell for each account you want to enable this setting for.
Note
This setting is not supported through download. In a downloaded spreadsheet, you will see an empty cell in the MSCLKID Auto Tagging Enabled column even if this setting has been enabled.
Preparing your spreadsheet for uploading
Once you have made all your changes, you are ready to upload your spreadsheet. Keep in mind a few things:
- When you save your spreadsheet, make sure you:
- Select Unicode Text for Save as type.
- Use quotation marks around the name you give your file, and include ".csv" at the end (as in, "YourFileName.csv"). The quotation marks will not appear in your final file name — they are there to prevent Excel from adding ".txt" to the file name.
- The file size cannot be greater than 100 MB or have more than 4 million rows.
- The data must not exceed the limits defined in this article.
For instructions on how to upload your spreadsheet, check out Upload an edited spreadsheet.