Set up UET tags using Shopify
Set up UET tags using Shopify
If you built your website on Shopify, read this article to learn how to set up UET tags on it.Notes
- This article shows how to do a basic setup of UET tags using Shopify. Please refer to the Shopify Help Center for more information.
- Microsoft Advertising is not responsible for Shopify's processes or documentation, nor for changes made to Shopify's processes or documentation.
- By installing the Microsoft Advertising app for Shopify, UET tags are automatically created and added to every page of your website. Go to the Install an app page and follow the prompts to get your Microsoft Advertising app for Shopify set up.
If you created and manage your website with Shopify, you can add and manage your UET tag there.
Implementing UET using Shopify
-
From the top menu, select Tools > UET tag.
If you're using the new Microsoft Advertising navigation, from the navigation menu on the left, hover over Conversions and select UET tag.
- Copy your JavaScript UET tag tracking code.
-
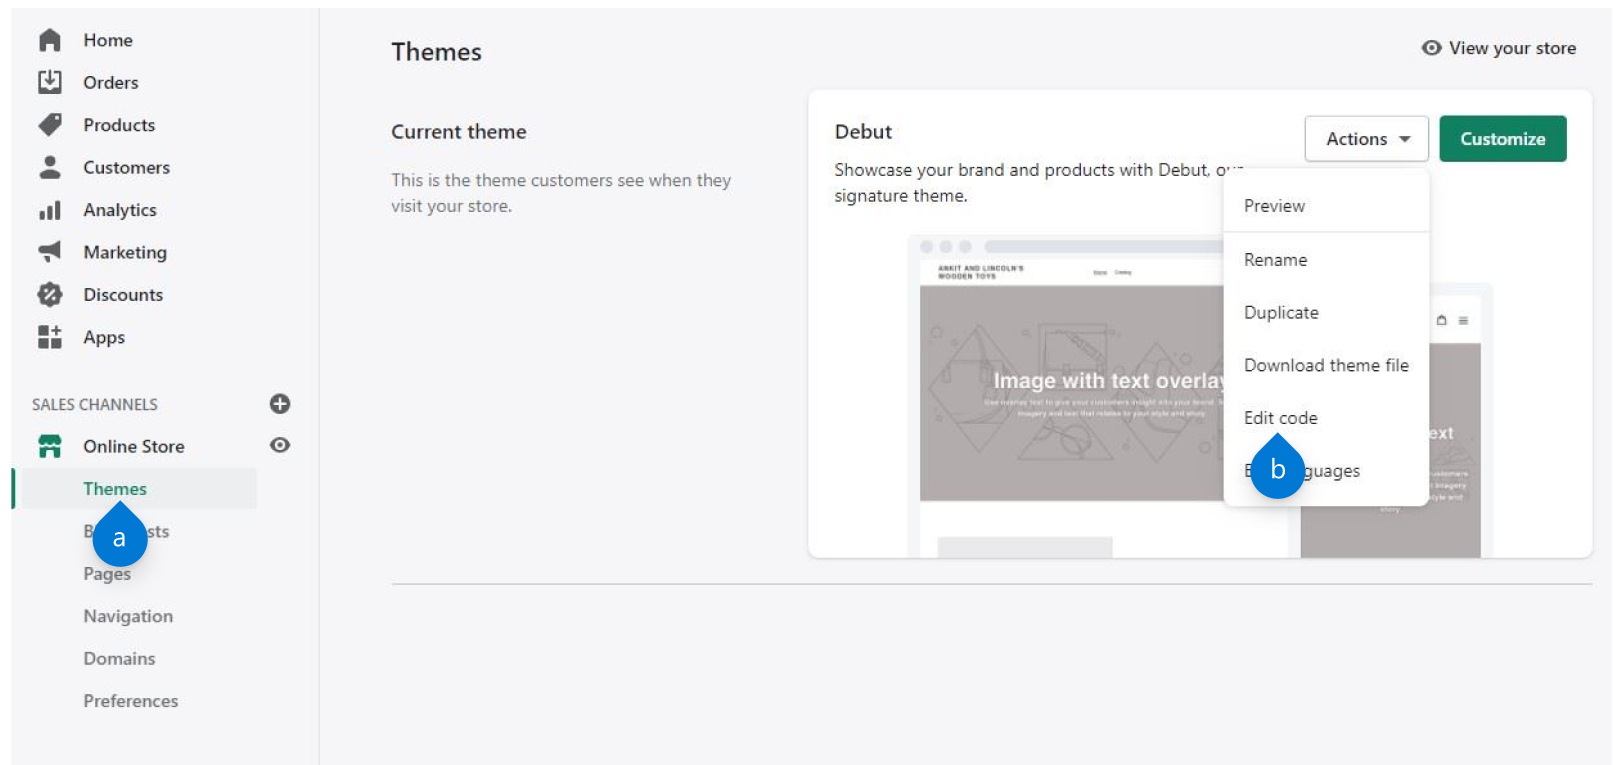
Sign in to your Shopify account.
- Select Online Store > Themes.
-
Under Current theme, select Actions > Edit code.
-
Install the UET tag.
-
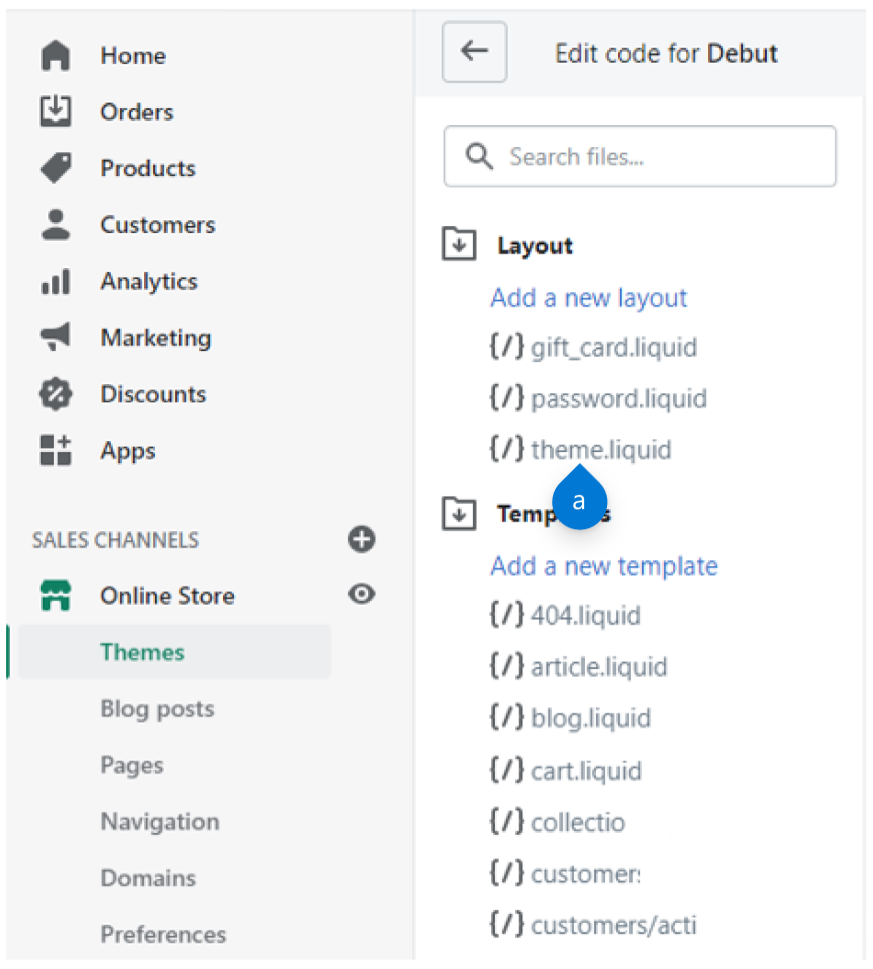
Under Layout, select theme.liquid.
-
Scroll down the page until you are at the <head> tag.
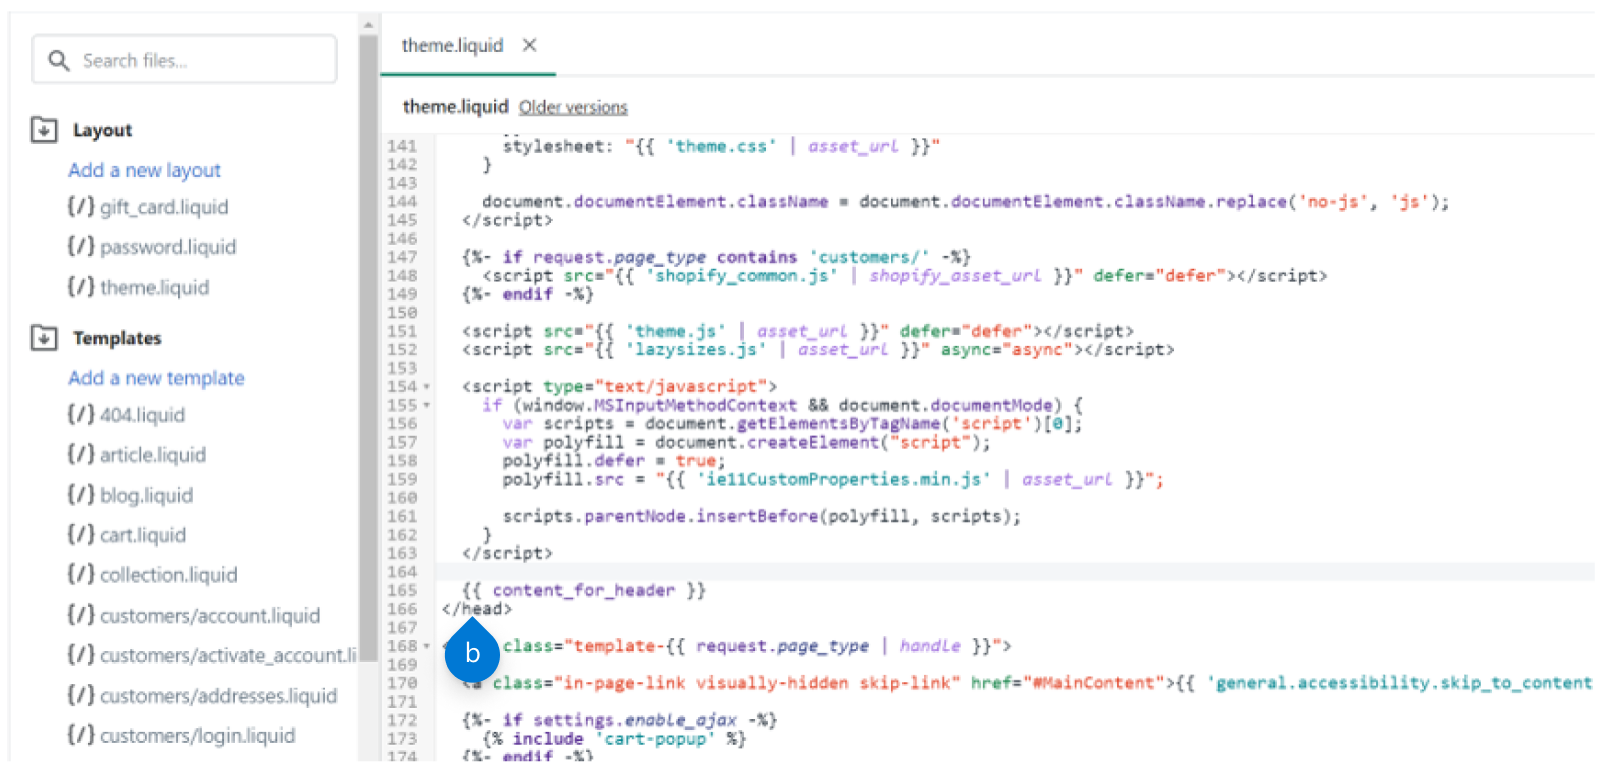
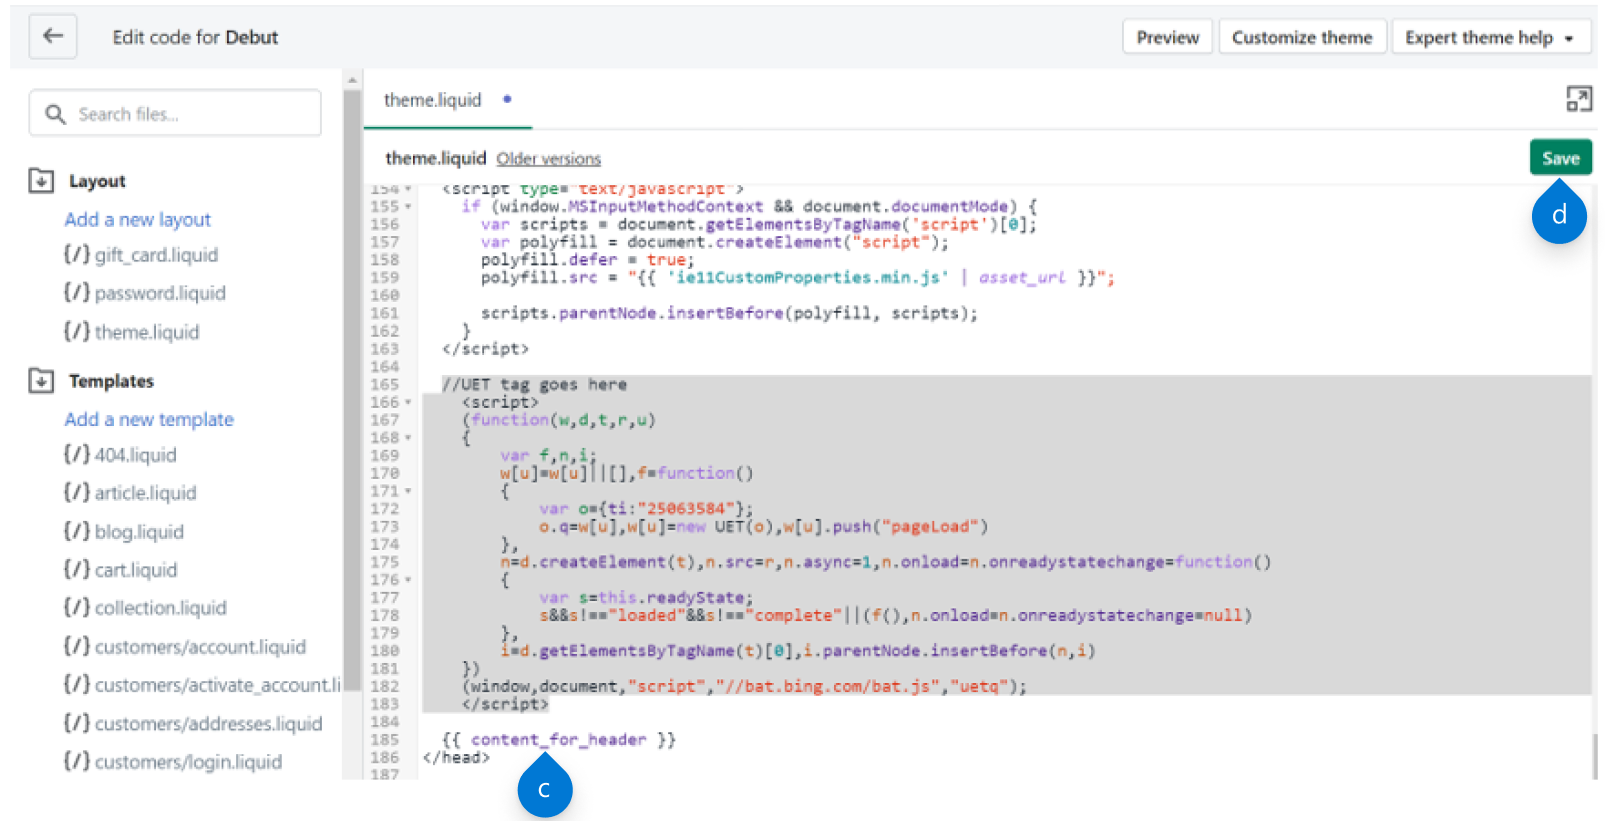
- Paste the UET tag directly above {{ content_for_header }}.
-
Select Save.
-
Under Layout, select theme.liquid.
-
Customize your online checkout process.
- From the top menu, select Settings.
-
Select Checkout.

-
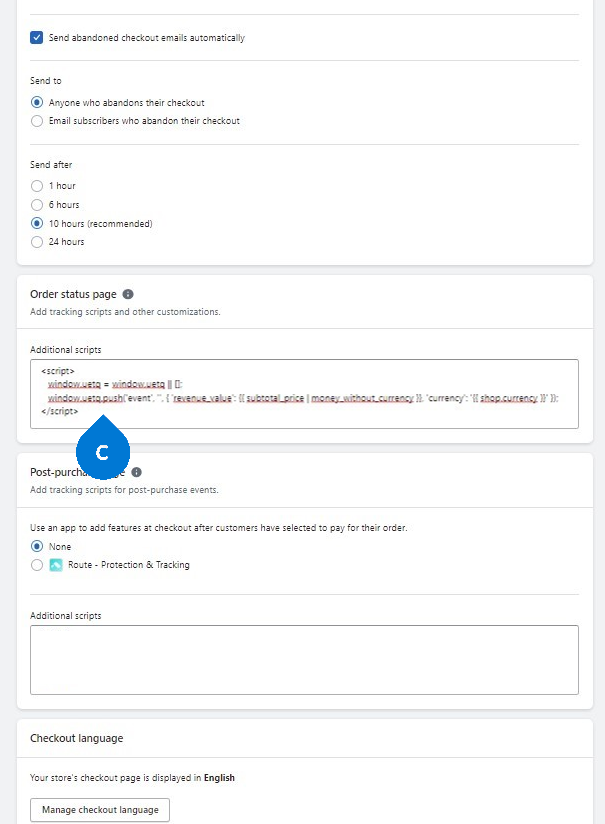
Scroll down to the Additional scripts field under Order status page. Paste the UET tag in Additional scripts.
Note
You can ignore the Additional scripts field under Post-purchase page if you're not tracking past buyers.
- Select Save.
- If you want to report variable revenue, add one of the following code snippets below the UET tracking code you pasted in the previous step:
- Use this code if you want to exclude taxes and shipping:
<script> window.uetq = window.uetq || []; window.uetq.push('event', '', { 'revenue_value': {{ subtotal_price | money_without_currency }}, 'currency': '{{ shop.currency }}' }); </script> - Use this code if you want to include taxes and shipping:
<script>
   window.uetq = window.uetq || [];
   window.uetq.push('event', '', { 'revenue_value': {{ total_price | money_without_currency }}, 'currency': '{{ shop.currency }}' });
</script>
- Use this code if you want to exclude taxes and shipping:
Note
To validate that your Shopify UET tag is working, download and install UET Tag Helper. Go to your Shopify website and verify that a UET event is received and that the Tag ID matches the tag you selected in Step 1.
How do I modify my UET tag for dynamic remarketing with Shopify?
- In Shopify, go to Online Store > Customize.
- Select the Theme actions ellipsis and select Edit code.
- Under Templates, find index.liquid.
-
Use this code for General visitors:
<script> var productList = []; {% for product in collections.frontpage.products %} productList.push({{ product.id }}); {% endfor %} window.uetq = window.uetq || []; window.uetq.push('event', '', {'ecomm_prodid': productList, 'ecomm_pagetype': 'home'}); </script> -
Select Save.
- Under Templates, find search.liquid.
-
Use this code for Product searchers:
<script> var productList = []; {% for item in search.results %} {% if item.object_type == 'product' %} productList.push({{ item.id }}); {% endif %} {% endfor %} window.uetq = window.uetq || []; window.uetq.push('event', '', {'ecomm_prodid': productList, 'ecomm_pagetype': 'searchresults'}); </script> -
Select Save.
- Under Templates, find product.liquid.
-
Use this code for Product viewers:
<script> window.uetq = window.uetq || []; window.uetq.push('event', '', {'ecomm_prodid': '{{product.id}}', 'ecomm_pagetype': 'product'}); </script> -
Select Save.
- Under Templates, find cart.liquid.
-
Use this code for Shopping cart abandoners:
<script> var productList = []; {% for line in cart.items %} productList.push({{ line.product_id}}); {% endfor %} window.uetq = window.uetq || []; window.uetq.push('event', '', {'ecomm_prodid': productList, 'ecomm_pagetype': 'cart'}); </script> -
Select Save.
- Go to Settings and select Checkout.
- Under Order Processing, find the Additional scripts text box.
-
Use this code for Past buyers:
<script> var productList = []; {% for line in checkout.line_items %} productList.push({{ line.product_id }}); {% endfor %} window.uetq = window.uetq || []; window.uetq.push('event', '', {'ecomm_prodid': productList, 'ecomm_pagetype': 'purchase'}); </script> - Select Save.
Important
- The product ID in Shopify must match an ID in your product feed.
- Shopify will automatically create product IDs for your products. You can configure Shopify to update your feed management solutions with Shopify product IDs which can then be imported into Microsoft Merchant Center.
See more videos...